SMTP
- DKIM
- MS GRAPH
SMTP
By setting up your SMTP Inrecruiting will send Emails to your server that will forward them to the recipients.
You will then need to tell Inrecruiting which SMTP server to send your Emails to, by entering some data in System Settings > E-mails > SMTP & DKIM Settings > SMTP Settings.

The data you will have to enter for the configuration are:
- Host Address: (e.g. smtp.office365.com)
- Host Port: 465 (SSL required) or 587 (TLS required)
In case your SMTP server does not require authentication, your configuration is finished. Otherwise, Inrecruiting offers two authentication methods:
- Basic Authentication
- OAuth2, also known as Modern Authentication
In the case of Basic Authentication, after clicking on the relevant option, you will need to enter the following configurations:
- Username: generally the email address with which to log in
- Password: the password associated with the username
In the case of OAuth2, before you can proceed, you will need an application registered on your tenant.
Microsoft
In order to use OAuth2 with Microsoft it is necessary to perform preliminary operations.
- An application registered on the Azure portal is required. In case you don't have one, you can follow this guide https://learn.microsoft.com/it-it/azure/active-directory/develop/quickstart-register-app
- On the left, open the Authentication menu
- On the Authentication page click: Add a platform> Web
- Enter as a redirect URI:
https: // {domain} .intervieweb.it / azure_smtp_oauth.php
https: // staging- {domain} .intervieweb.it / azure_smtp_oauth.php
https: // test- {domain} .intervieweb.it / azure_smtp_oauth.php
The {domain} part will be replaced with the domain from which Inrecruiting is accessed (e.g. https://inrecruiting.intervieweb.it/azure_smtp_oauth.php) - Open the API Permissions menu
- On the API permissions page click on: Add a permission> Microsoft Graph> offline_access
f you do not have one, from the Certificates & Secrets menu go to the Client Secrets submenu and proceed with the generation.
IMPORTANT: Save this value because it cannot be viewed again. - Ensure you have enabled the SMTP authentication (https://learn.microsoft.com/en-us/exchange/clients-and-mobile-in-exchange-online/authenticated-client-smtp-submission)
At this point, on Inrecruiting you can proceed to configure the service. The required configurations are:
- Username: the email you want to use to send emails
- Client ID: Azure Client (Application) ID. It can be retrieved from the Azure application overview screen
- Client Secret: The client secret generated earlier
- Tenant ID: in the case of an Azure application configured as a single tenant, the tenant id to be used can be retrieved from the application overview screen, otherwise leave this value blank
Once the configuration has been saved, you will be able to log into Microsoft. The procedure is complete upon successful login.
Google/Gmail
https://support.google.com/a/answer/176600?hl=en
NB: in case of activation of Smtp it is recommended to ask Inrecruiting support for the IP address to be included in the whitelist.
NB: during the password input process it is necessary to tick the "stay logged in" item in the dialog box
DKIM
Alternatively, is it possible to verify the domain / DKIM:
In the section System Settings > E-mails > SMTP & DKIM Settings > DKIM it will be sufficient to enter your domain and click on the "Save" button:

You can then download the file with the parameters that must be set on your server by clicking on "Download Record Set as CSV":

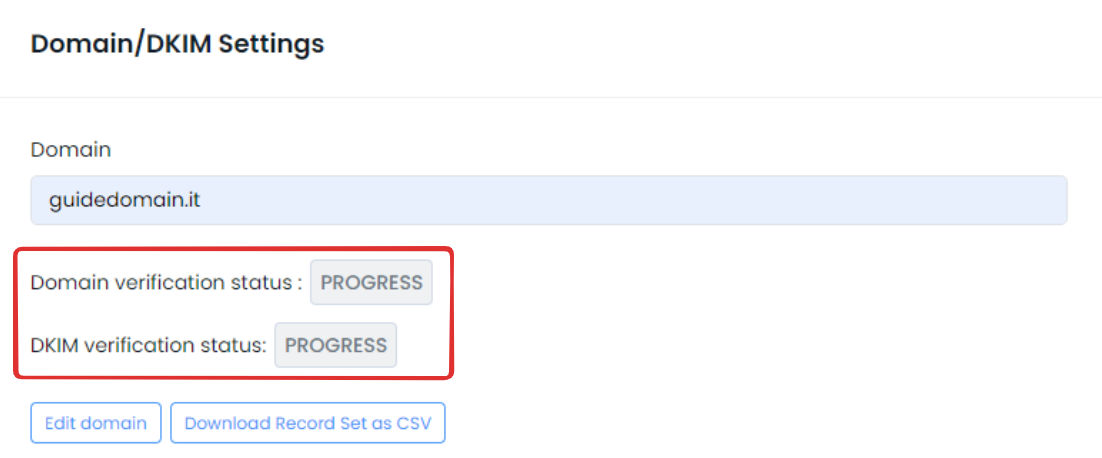
Below the box containing the domain you can view the status of the domain and DKIM verification:

In case the domain entered is wrong or you want to replace it, just click on the "Edit domain" button.
Below the links to the AWS documentation for SPF, DKIM and DMARC:
SPF: https://docs.aws.amazon.com/it_it/ses/latest/dg/send-email-authentication-spf.html
DKIM: https://docs.aws.amazon.com/ses/latest/dg/send-email-authentication-dkim.html
DMARC: https://docs.aws.amazon.com/ses/latest/dg/send-email-authentication-dmarc.html
MS GRAPH
In order to use the Microsoft Graph API it is necessary to perform preliminary operations.
- An application registered on the Azure portal is required. In case you don't have one, you can follow this guide https://learn.microsoft.com/it-it/azure/active-directory/develop/quickstart-register-app
- On the left, open the Authentication menu
- On the Authentication page click: Add a platform> Web
- Enter as a redirect URI:
https: // {domain} .intervieweb.it / azure_smtp_oauth.php
https: // staging- {domain} .intervieweb.it / azure_smtp_oauth.php
https: // test- {domain} .intervieweb.it / azure_smtp_oauth.php
The {domain} part will be replaced with the domain from which Inrecruiting is accessed (e.g. https://inrecruiting.intervieweb.it/azure_smtp_oauth.php) - Open the API Permissions menu
- On the API permissions page click on: Add a permission> Microsoft Graph> Delegated permissions, then select:
-) offline_access
-) Mail.Send
-) User.Read - If you do not have one, from the Certificates & Secrets menu go to the Client Secrets submenu and proceed with the generation.
IMPORTANT: Save this value because it cannot be viewed again. - Ensure you have enabled the SMTP authentication (https://learn.microsoft.com/en-us/exchange/clients-and-mobile-in-exchange-online/authenticated-client-smtp-submission)
At this point, on Inrecruiting you can proceed to configure the service. The required configurations are:
- Username: the email you want to use to send emails
- Client ID: Azure Client (Application) ID. It can be retrieved from the Azure application overview screen
- Client Secret: The client secret generated earlier
- Tenant ID: in the case of an Azure application configured as a single tenant, the tenant id to be used can be retrieved from the application overview screen, otherwise leave this value blank
Once the configuration has been saved, you will be able to log into Microsoft. The procedure is complete upon successful login.
NB: in case of activation of MS Graph it is recommended to ask Inrecruiting support for the IP address to be included in the whitelist.
NB: during the password input process it is necessary to tick the "stay logged in" item in the dialog box
Was this article helpful?
That’s Great!
Thank you for your feedback
Sorry! We couldn't be helpful
Thank you for your feedback
Feedback sent
We appreciate your effort and will try to fix the article